So, now that we can draw circles and lines and call them from reusable
subroutines, what is next? Let’s use these concepts to make some geometric
shapes. Items like triangles, squares and circles will really test our ability
to put the Scribbler through its paces.
In this section we are going to introduce another new programming
concept called Looping. If you were to guess, what do you think looping is?
If you said going in a circle or repeating something over and over, then you
are correct. Looping allows you to perform a program segment over and over
again without having to retype it several times.
Before we get into using loops, let’s create some basic shapes and
record some information that we can use to make future programs easier.
Pre-Activity Check
List:
- Fresh/Charged Batteries
installed into the Scribbler 2 robot.
- Scribbler Connected to
your computer via USB cable and USB to Serial Adapter. Note: Review the Getting
Started section to see how to properly connect the Scribbler
to the computer.
- Sharpie and a paper/pad
OR a dry erase marker white board. NOTE: Do NOT use a sharpie on the white
board.
- An area where you can
place the Scribbler to draw.
- Review the Looping
section of the Scribbler Tips Documentation
Activity Steps:
- Open the Scribbler
Program Maker on your computer.
- Start with a blank
program or click the Clear button to clear the program
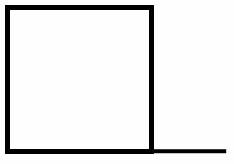
- Create a subroutine that
draws a 4 inch square.
- The starting point is
the lower left corner and the Scribbler will move to the right.
- When the subroutine is
complete, Scribbler should be 2 inches from the lower right corner, again
heading toward the right.
- Your shape should look
like this when complete:
- Call the Subroutine
from the Main Green Gear
- Upload the program to
Scribbler and test it with a whiteboard or sheet of paper. Modify the
program to make it look just like the sample.
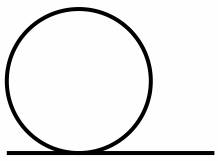
- Create a subroutine that
makes a 4 inch circle
- Just like the square,
start at the lowest point at the lower left of the curve, moving right.
- Finish 2 inches after
the start of the circle
- Your shape should look
like this when complete:
- Modify the Main Green
Gear to call this subroutine only and not the “square” subroutine.
- Upload the program to
Scribbler and test it with a whiteboard or sheet of paper. Modify the
program to make it look just like the sample.
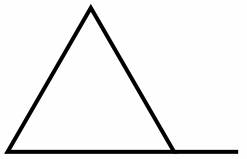
- Create a subroutine that
makes a triangle with 6 inch sides.
- Just like the square
and circle, start at the lowest point at the lower left of the triangle,
moving right.
- Finish 2 inches after
the end of the triangle.
- Your shape should look
like this when complete:
- Modify the Main Green
Gear to call this subroutine only.
- Upload the program to
Scribbler and test it with a whiteboard or sheet of paper. Modify the
program to make it look just like the sample.
- As are you creating
these shapes, now is a good time to log some of the common angels that you
will be using now and in the future.
- Use some testing to see
exactly what speed and duration it takes to reach each of the angles.
- Use a protractor to
measure your angles.
- Fill in the values for
this table in your Activity Worksheet.
Number of Degrees |
Left Wheel Speed |
Right Wheel Speed |
Time |
90 Degrees |
|
|
|
180 Degrees |
|
|
|
45 Degrees |
|
|
|
30 Degrees |
|
|
|
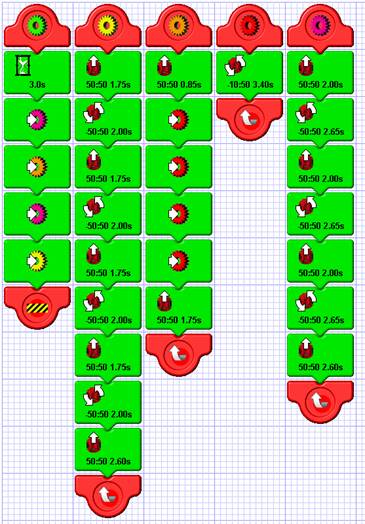
- Put it together!
- Modify the Main Green
Gear and call the shapes in any order you want. Include at least 4
different calls.
- Your output may look
something like this

Now, what if we wanted to
repeat one of these shapes 4 times? We could just insert a call subroutine 4
times, or we could use a loop.
- Clear out the Main Green
Gear routine, making sure you leave the other subroutines we just built
intact.
- Insert a Program Loop by
clicking the “Program Loop” button.
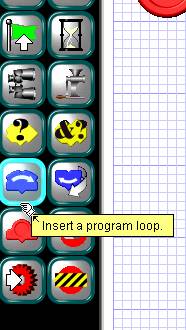
- Once you add the Program
Loop Tile, the Loop Counter Panel will open. Set the Counter
to 4 (this is how many times the loop will run), and click the Green
Checkmark.
- Your Main green gear
routine should look like this:
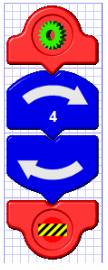
Now, the program is set to
repeat 4 times and then end. But, we have not added anything inside the loop
to repeat. Let’s add one of the shape subroutines that we used earlier in the
activity.
- In between the two blue
loop blocks, insert a call subroutine Tile to call the yellow gear
routine.
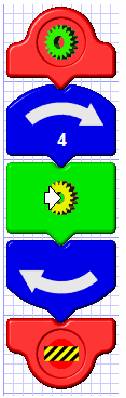
- Upload and run the
program on a sheet of paper or a white board. In your work sheet,
describe what happened and draw a picture of it. Is it what you expected?
- Save your program.
>>Update the Lesson
Worksheet with your observations. |