Alright, it is the moment
you’ve been waiting for! Finally, we get to make our robot move!! So, how
exactly does the robot move? Take a second to pick up the robot and really
look at it. How do you think it moves? What do you think that black ball in
the back of the robot does? Well, as you probably guessed, the Scribbler uses
the two large wheels to roll along its path. The big wheels are powered by motors
that are connected to the Scribbler’s microcontroller chip (the “brains” of the
operation) that we can control with programming.
As for that small black
wheel in the back, it is just used for balance and is not powered by a motor.
However, as we will see later, it is very important in helping the scribbler
tell if it is stuck!
Using Tile programming,
the same way we worked with lights and music, we can make the wheels do pretty
much anything we can think of. We will be able to draw complex shapes, create
letters, run mazes, and even dance. For now though, let’s work on getting the
scribbler to move in a straight line.
Pre-Activity Check
List:
- Fresh/Charged Batteries
installed into the Scribbler 2 robot.
- Scribbler Connected to
your computer via USB cable and USB to Serial Adapter. Note: Review the Getting
Started section to see how to properly connect the Scribbler
to the computer.
- Ruler or measuring tape
to determine distance.
- Clear area to work with
where the Scribbler can roll.
- Review the Insert a Move
Command Section of the Scribbler Tips Documentation
Activity Steps:
- Open the Scribbler
Program Maker on your computer.
- Using a new program,
insert a Move Tile into your program
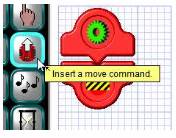
- As soon as you drop the
Move Tile into your program, the Motion Panel will open. There are a lot
of items that can be adjusted, but it is not really that complicated.
Remember, if you want a more in-depth look at the Motion Tile, you can
review the Insert a Move Command Section of the Help
Documentation.
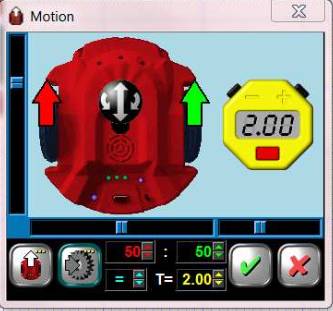
Even with all the
settings, there are only two things we are adjusting on this Panel: How Fast
each wheel is turning and for How Long. That’s it!
- The easiest way to
adjust the settings is to grab the Joystick (the black circle in the
center of the scribbler) and drag it to where you want to go.
- All of the other
settings are a way to fine-tune the speed.
- To adjust the time you
want the Scribbler to move, use the Time/Distance ‘Stop watch’ to add or
remove time.
IMPORANT: There is no setting for how far (distance) to move
Scribbler, only the time and speed.
Can you think of a way we could find out how far Scribbler will move if we know
how fast (speed) and how long (time) it is moving?
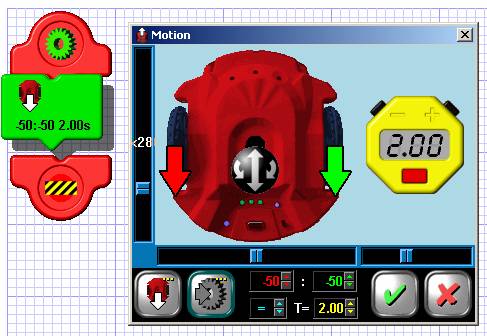
- Let’s move the Scribbler
forward at 50% power for 2 seconds. To do that, make your panel settings
match the picture below. Click the Green Checkmark when you are
done.
- The Motion Tile will be
inserted into your program.
- Now, before we send this
program to the Scribbler, we want to be able to have time to position our
Scribbler before it starts rolling away. As we have it now, Scribbler
will just start rolling as soon as we copy the program to it. Let’s add a
new Tile into the program that will have it pause for 5 seconds to give us
a chance to move it into position.
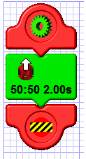
- Look for the Pause Tile
(it looks like an hour glass) and insert it above the Motion Tile we just
inserted.
- Once you insert the Tile,
the Wait a While Panel will appear. Adjust the time to 5 seconds
using the bar on the side, and then click the Green Checkbox.
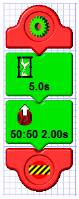
- Your program will look
like this.
- Once you have the
program set correctly, you can program the Scribbler.
- NOTE: You will have 5
seconds from the time the Upload Successful window appears before the
Scribbler starts moving. Plan ahead and be ready for it, so you can
disconnect the robot from the computer quickly and place it in a safe
area to move.
- Optionally, you can
turn the Scribbler OFF after the Upload Successful message
appears. Then disconnect the robot and place it where you want it to
roll. When you are ready, you can turn the robot back on and it will run
your program.
Did
your robot move like you thought it would? Place a mark at the start spot of
the robot. Press the Reset button to rerun the program. Then mark the
end spot. (Make sure you marked the same wheel location or the same location
of the scribbler both times). Use a ruler to measure the distance. Then, try
the experiment 3 more times. Does it go the same distance each time? What do
you think would happen if we told the Scribbler to go for 4 seconds instead of
2 seconds? Let’s try some experiments.
- Try each of settings and
record your results. Hint: Once you try a few tests, you will be able to
predict how far the Scribbler will move.
- Modify the program to
run for 2.5 seconds instead of 2 seconds. Leave the wheel speed at 50.
Measure the distance and record your results.
- Do the same as above,
but change the time to 5 seconds. How far did Scribbler go compared to
when it was at 2.5 seconds?
- Now, modify the Speed
of the wheels. Set the speed to 100 for each wheel and set the time to
2.5 seconds. How far did Scribbler go? Record the results. How did it
compare to when you had the wheel speed set at 50 and the time at 5
seconds? Do you think you can estimate how far the Scribbler will move
without having to run another program?
- How far do you think
the Scribbler will move with a speed of 75 on each wheel for a time of 2
seconds?
- Modify the Motion Tile
so that instead of moving forward, Scribbler is moving backwards. Move the
Joystick the opposite direction for 2 seconds at a wheel speed of 50.
Did the Scribbler move as
expected?
Complete this table in
your worksheet. These values will
make it MUCH easier when you are working on future programs, as you can just
look up the values to see how far scribbler will go.
Distance (inches) |
Speed |
Time |
Distance (in centimeters) |
1 inch |
|
|
|
2 inches |
|
|
|
4 inches |
|
|
|
6 inches |
|
|
|
12 inches |
|
|
|
>>Update the Lesson
Worksheet with your observations.
Congratulations, you have
now used programming to make a robot move. You are well on your way to
becoming a robotics expert! In our next activity we will be working on turning
and how to vary the wheel speeds to do more than then move forward and
backward. |