In this activity we will
be programming with the Music Tile to make our Scribblers make sounds and play
notes. I know what some of you are thinking, “I just want to drive my robot
around!!” We will get to that next activity, but we need to understand the
basics of how to work with programming Tiles and how the Scribbler Program
Maker really works before jumping in with both feet.
We are now going to get
the Scribbler Robot to play a sound sequence. Unlike most new devices, the
Scribbler doesn’t have an MP3 plug to play your music. No, Scribbler uses
pre-programmed notes, tones and even Morse Code to make music. By the time you
finish this activity, you will be able to play all kinds of music on your
robot.
Pre-Activity Check
List:
- Fresh/Charged Batteries
installed into the Scribbler 2 robot.
- Scribbler Connected to
your computer via USB cable and USB to Serial Adapter. Note: Review the Getting
Started section to see how to properly connect the Scribbler
to the computer.
- Clear area to work with
the Robot still connected to your computer.
- Review the Inserting
Music section of the Scribbler Tips Documentation
Activity Steps:
- Open the Scribbler
Program Maker on your computer. The button looks like a little Scribbler
Robot, and the name will be called “S2”
- Note: If you already
have a program open, you can save your program and then use the Clear
Sheet button to start a new program from scratch.

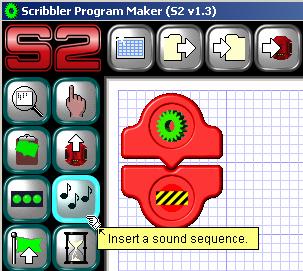
- Click the Insert a
Sound Sequence Tile and insert it into your program.
- The Create Sounds panel is where you can select the types of sounds to include in your
program. Not only can you insert sounds, but you can change those sounds
by modifying the playback speed. Try out some sounds now.
- To preview the
sounds on the left side of
the panel, move your mouse over the Sound color bar and Click and HOLD down
your right mouse button. The sound will continue playing until you let go
of the right mouse button.
- To add a sound to your program, click the Sound you want
with the left mouse button. You can add up to 8 different sounds to
create your own song.
- If you want to adjust
the playback speed, use your left mouse button to click a Sound color
bar on the right side of the screen. Then you can move the slider
between the turtle and the racehorse to slow down or speed up the sound bite.
- Click the Preview button (looks like a play arrow) to preview all of your sound bites
together.
- If you are happy with
the notes you have made, click the Green checkmark to save your
settings.
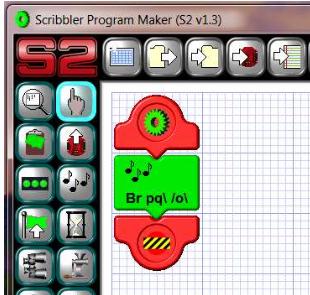
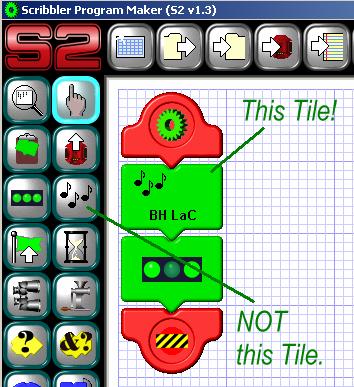
Your program will now look
something similar this screen
- Now, we are going to
combine this with what we did in the first activity. We are going to add
a LED Tile after the Sound Tile.
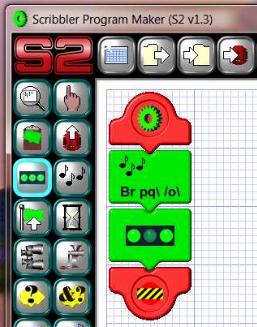
- Click the LED Tile with
your left mouse button and insert it into the program just below the
green Music Tile.
- You can leave all 3
LEDS switched on, or change them to any pattern you choose. Click the Green checkbox when you are done. Your program should look similar to this
one.
- Now that we have two Tiles
that will turn lights on and play music, we need to upload the program to
the Scribbler.
- Make sure that the
Scribbler is plugged into the USB cable and attached to the computer.
- Turn on the Scribbler
Robot and verify that the Blue Light is on.
- Click the “Copy
to Scribbler” button to start the process
- When the program is
finished uploading you should hear your music and the LEDs will turn on.
- Press the blue Reset
button on the Scribbler if you want to run the program again. Every time
you click the blue Reset button, your program will stop doing what it is
doing and begin from the beginning again!
- Which happens first?
Does the music play or the LEDs light up? Is it always the same when the Reset
button is pressed? Try it a few times.
- Because programming
using the Scribbler Program Maker goes sequentially, from top to bottom,
the music will ALWAYS play before the lights turn on.
TIP: Tiles ALWAYS play from Top to Bottom
- the ones on top will play before the Tiles below them. Place the tiles in
the order that you want them to play.
Part 2: GUI is Not
Yucky
Let’s take this time to
learn a little bit more about the Scribbler Program Maker and how it works.
The Scribbler Program Maker is a GUI Program. GUI is pronounced like, “GOOEY.”
GUI is another way of saying a Program we can interact with. GUI stands for Graphical User Interface. The nice thing about GUI programs is everything
is visual and we can use our mouse to access different features in a program
very easily.
Not all programming
language environments are this easy to use. Most are text based where you type
in all the commands instead of clicking them with a mouse.
Using the GUI, let’s go
ahead and add to our music program.
- Click the Sound button and use your mouse to move the green sound Tile into your program.
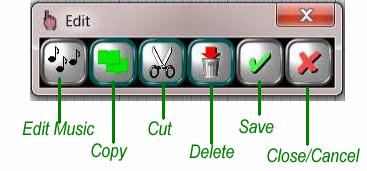
- Next, right click the
music Tile that you just placed into your program. The Edit Tile panel
will pop up.
Note: For a refresher on
basic program operation like cutting, copying and deleting, review the Getting
Started section.
- If you want to update or
add music to your Tile, click the Edit Music button. The same
screen that you used when you originally created the music will be shown.
You can add or change your sound bites if you want, just be sure to click
the Green Checkmark if you do!
- Let’s use the GUI to make copies of the music and LED Tile we
already have in the program. It takes 3 steps to copy Tile: 1) Select
what you want to copy, 2) Copy the Tiles, 3) Select where you want to
paste the Tiles you copied.
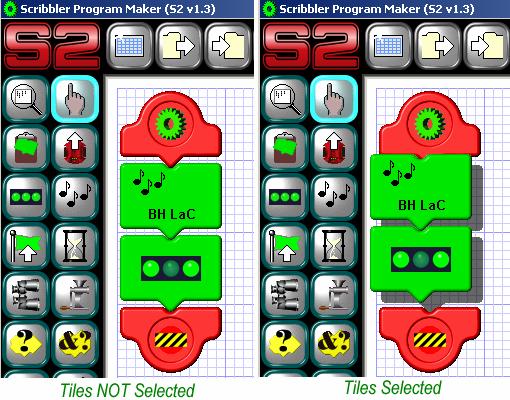
- First, select what you want to copy. Use your left mouse button
and click once on each green Tile in your program. Notice they rise up
and they look to be floating above the other Tiles; that shows you they
are selected.
- Now that you have your two green programming Tiles selected, use
your right mouse button to click either one of them. The edit box will
appear and you can select the Copy command with your left mouse button.
Click the Green Checkmark once you’ve copied the Tiles. Now, you
will notice that nothing has really happen. When you clicked the copy
button, all the Scribbler Program Maker did was remember what Tiles you
wanted to copy. To see then show up, you have to paste them.
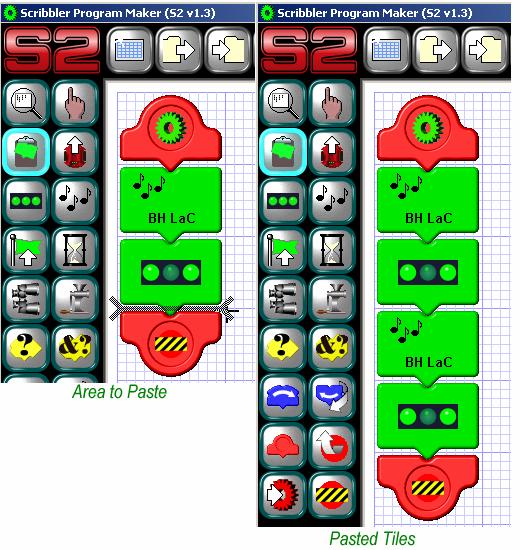
- To paste the Tiles, you just need to move your mouse over the
area of the program you want the paste and left click with your mouse.
Note that the Tiles play in order from top to bottom. So decide where you
want the new tiles to play and paste them there.
- Now, upload your program to the Scribbler. What happened? Did it
work the way you thought? Try practicing adding new lights and music Tiles
and copying, pasting and deleting them.
- When you are finished, don’t forget to save your program!
>>Update the Lesson
Worksheet with your observations. |