In this activity we will
work with the 3 Lights on the S2 Robot. The lights, called L.E.Ds, can be
turned on and off by using a special Tile in the Scribbler Program Maker.
Note: If you need to learn
more about how to use the Scribbler Program Maker, review the Getting Started section to get more comfortable with basic navigation and Tile placement.
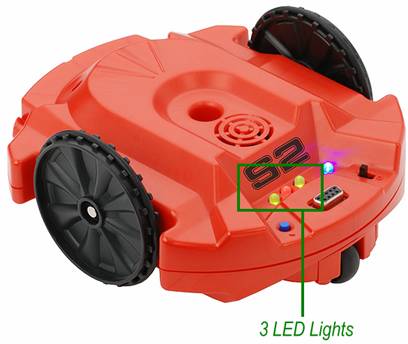
We will be modifying the 3
LED lights on the Scribbler. In this activity you will use the Scribbler
Program Maker to turn on and off the LED lights. Let’s get to it!
Each activity will have a
check list to make sure you have everything you need before you dive into the
activity. We call this the Pre-Activity Check list. Before moving into the
activity steps, make sure you have all items on the check list completed! These
are also included in your Worksheet document. Please check them off there.
Pre-Activity Check
List:
- Fresh/Charged Batteries
installed into the Scribbler 2 robot.
- Scribbler Connected to
your computer via USB cable and USB to Serial Adapter. Note: Review the Getting Started section to see how to properly connect the Scribbler
to the computer.
- Clear area to work with
the Robot still connected to your computer.
- Review the LED Tile
Section of the Scribbler Tips Documentation
Activity 1 Steps:
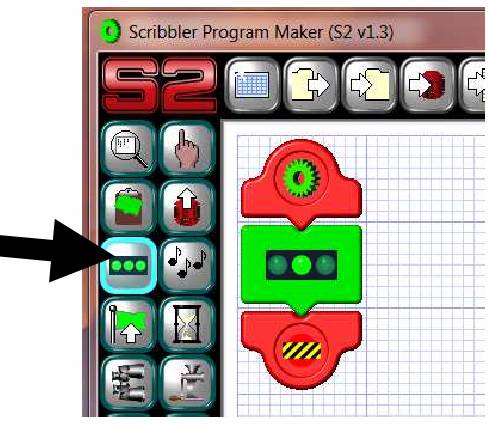
- Open the Scribbler
Program Maker on your computer. The icon looks like a little Scribbler
Robot, and the name is “S2”
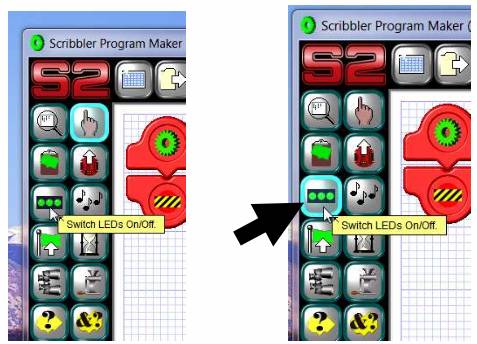
- Move your mouse over the
LED Tile. If you are not sure which Tile is which, you can hold your
mouse over the Tile and a yellow box with the description of the Tile will
appear after a couple of seconds. Click once to select the Tile, you will
notice that the Tile is now highlighted in blue to let you know that it is
selected.
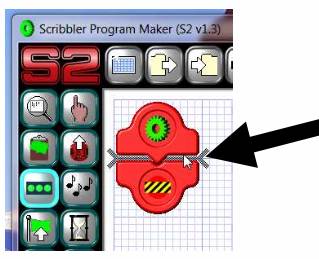
- After you have selected
the LED Tile, you can move your mouse to the programming area and insert
the LED Tile in between the Start and End Tiles. Click once with your
left mouse button to place the Tile in the program.
- Once you have inserted
the Tile into the program, the “Switch LEDs on/off” panel
will appear. This is where we turn the lights on and off.
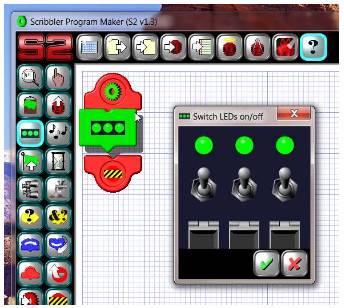
- The 3 LEDs and Switches
you see in this panel control the 3 LEDs on your Scribbler Robot. Each of
the LEDs can be told to do 3 things: turn on, turn off, or stay the same.
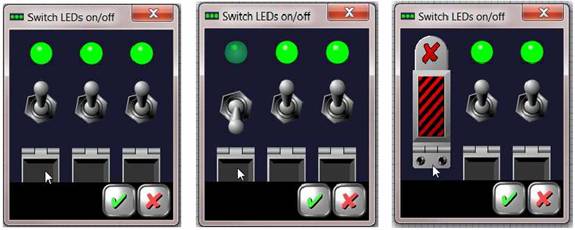
The lights in this panel
represent what the lights will look like on the Scribbler. In this example, in
the panel on the left, all 3 lights will be on. In the panel in the center,
the left light will be off, but the center and right light will be on. In the right
panel, we really can’t tell what is going to happen. The left light will stay
the same from what it was before in the program. So, if it was off before, it
will stay off. If it was on before, it will stay on.
- Here is where we
actually set the lights!
Set
the Center Light to be On and the Other Two Lights to be Off.
Make the Panel on your screen match the picture below. This is going to be
our first program. When you have the LEDs looking correct, click the Green checkmark. Once you click the Green checkmark, your screen should look
like below. Note: If you change your mind and don’t want to add the Tile,
click the Red X button and no changes will be made.
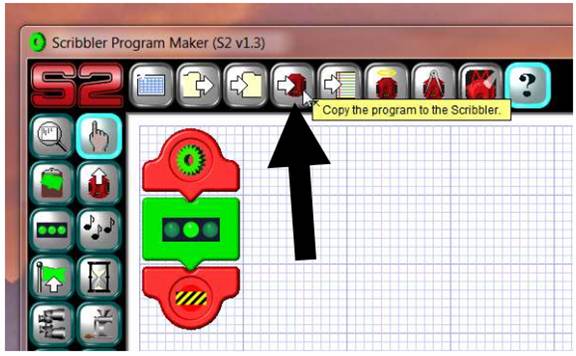
- Now here is the exciting
part, we get to copy the program from the Scribbler Program Maker to the
Scribbler Robot.
- Make sure that the
Scribbler is plugged into the USB cable and attached to the computer.
TIP: It’s a good idea to prop the
Scribbler up so the wheels don’t touch the table. This will prevent the
Scribbler from running away from you and falling off a table or desk!
- Turn on the Scribbler
Robot and verify that the Blue Light is on.
- Click the Copy to
Scribbler button to start the process.
When
the program starts copying (or uploading as it is called in the programming
world), you will see this message box:
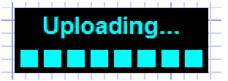
If
everything goes as planned, you will get an “Upload Successful” message
when the upload is complete.
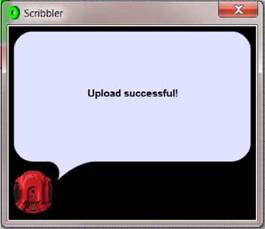
NOTE: If you get a
different message, please visit the Troubleshooting section. Don’t worry, it is probably
something very easy to fix!
- Now it is time to view
the results of your first program! Look at the Scribbler, the Center
Light should be lit and the Left and Right lights should be off; just like
in the Tile we set. Congratulations, you’re a Robotics Programmer!
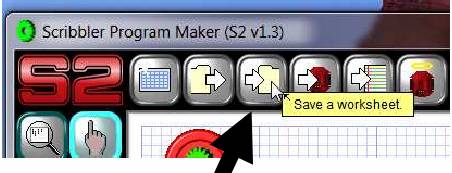
- If we want to modify or
come back to this program at a later time, we need to save it. To save
the program, click the “Save a Worksheet” button.
Save the program to the
area on the computer we you are supposed to save your files (as directed by
your instructor).
Also, be sure to name it
something that you will recognize later, like “Activity01.scb” or
“LightsOn.scb.” For tips on file naming and saving, review the Getting
Started section.
Part B - EDIT TILE
SETTINGS
- In this step you will modify
the program to turn on all the lights.
- Click the Edit button
(looks like a finger – shown in picture above) and then RIGHT click the
on the green lights Tile that is in your program. An Edit Menu will come
up.
- Click the first button in
the Edit Menu – looks like lights.
- The same Light Editing window
as before will come up. This time change the settings so that all three
lights are Green.
- Click the Green Check Box to Save your changes.
- Copy the program to the
Scribbler and run the program on the Scribbler robot. Did all the lights
come on? If not, go back and try again.
- Save the program with a
different name such as “Activity01B.scb” or “AllLightsOn.scb.” Note: from
this point on we will no longer make suggestions as to what to name your
programs. Just be consistent or use the naming convention defined by your
teacher.
>>Update the Lesson
Worksheet with your observations. |